Import your contacts to Brevo
Learn how to create, update, and import your contacts
If you want to start sending email campaigns, SMS, and marketing automation messages to your contacts from Brevo, there’s one very important step you need to take: importing your contacts.
Managing contacts
Import your contact's email address(s) as a minimum.
You may import as many additional data fields (we call them contact attributes) as desired, such as first name, last name, birthday, mobile phone number, etc.
💡 The easiest way to synchronize your contact lists programmatically is to use the endpoint to create and update a contact. In this tutorial, we'll walk through these two steps.
You can also use our advanced feature to import contacts using a .csv or .txt.
Other methods to manage contacts
If you are looking for how to manage contacts through Brevo App, or if you need to read more about contacts, refer to the help center tutorial.
Requirements
Make sure that you have your API key from your settings (SMTP & API).
If you are new to the API, read more about how the api works.
Create your first contact using the API
Let's learn how to use the API. The best way to know what's possible and how to use each endpoint is to go to the API Reference.
Under Contacts > Create a contact, you can find the description of the contact creation endpoint:
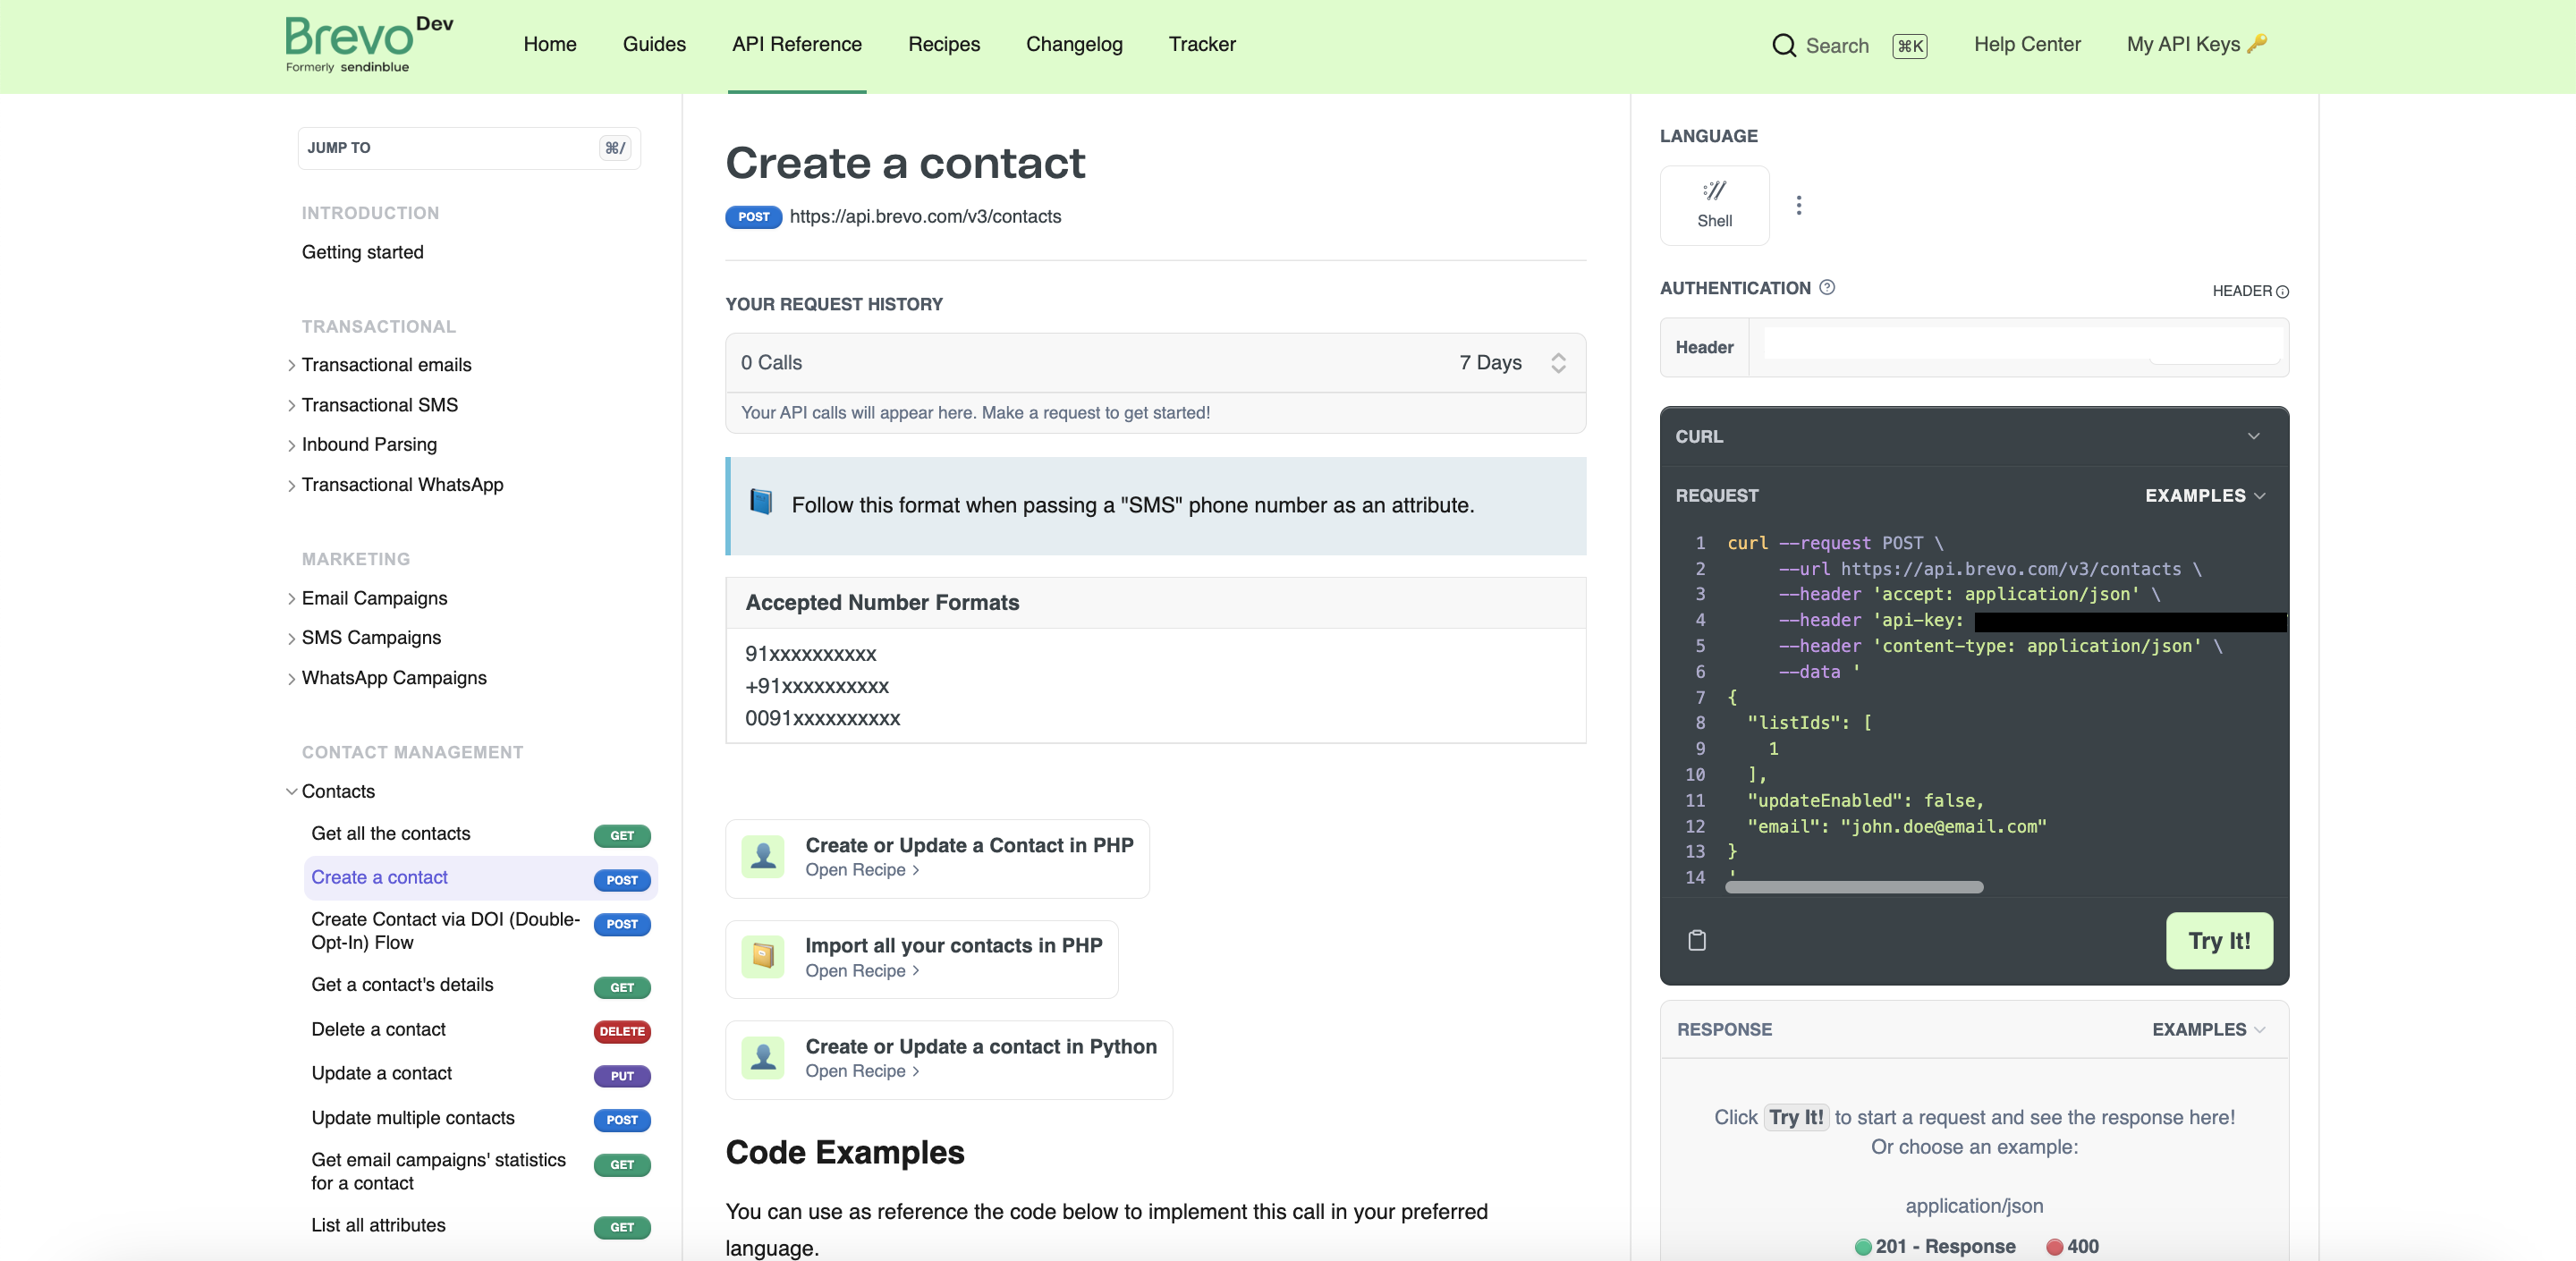
We will go over the 6 points outlined in the screenshot above.
1. Endpoint and method
To create a new contact, you need to call https://api.brevo.com/v3/contacts using the method POST
2. Body and Path parameters to send in your request
You can either create an email contact, an sms contact, or both.
💡 To create an email contact, simply use the email parameter.
Send
{"email": "thomas.bianchi@email.com"}as the body of your request.
💡 To create an sms contact, use the attributes parameter.
Send
{"attributes": {"sms": "0612345678"}}as the body of your request.
💡 You can combine both and add more data to the contact.
Send
{"email": "thomas.bianchi@email.com", "attributes": {"sms": "0612345678", "LASTNAME":"Bianchi", "FIRSTNAME":"Thomas", "DELIVERYADDRESS": "176 Boulevard des fleurs, 75014 Paris, France"}}as the body of your request to specify the full name of your contact and its address.
If you have an existing contact list, you can specify the id of the list(s) you want to associate the contact with. You can either get the contact list id from Brevo platform by going to Contacts > Lists or using the API endpoint to get all the lists.
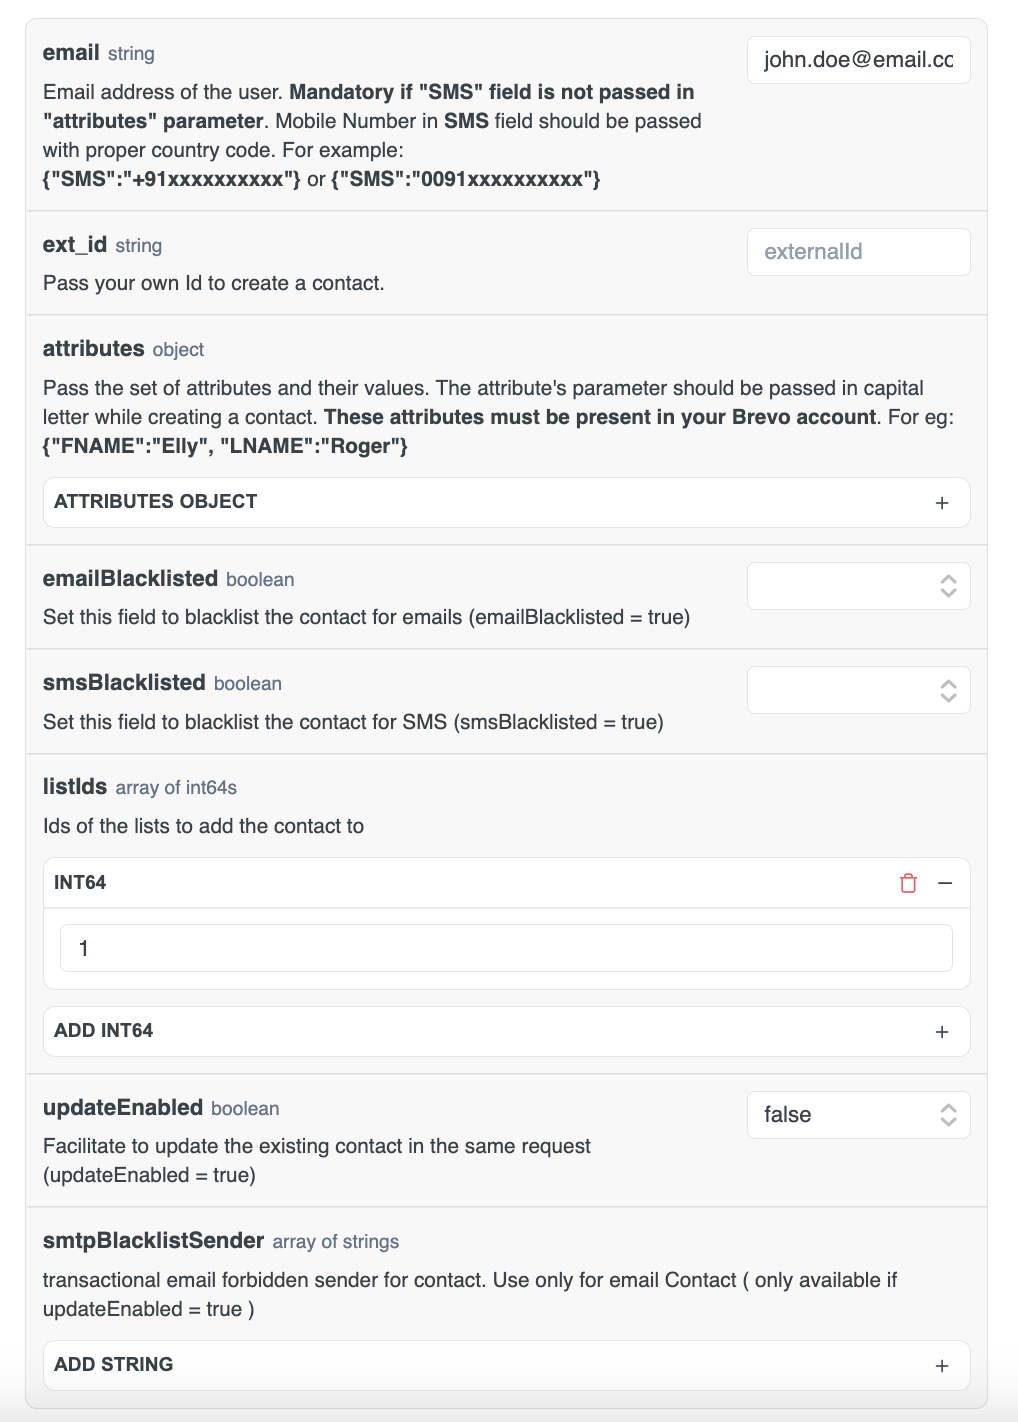
Brevo API body parameters to create a contact
3. Response that you should expect
If everything goes well, you should get a success response (code 201) with a JSON body giving you the id of the contact created.

Brevo API response description
If the parameters you entered are wrong, you'll get a 400 error along with an error message and error code. Find the list of errors here.
Here, typical errors will be:
- the email address or phone number is invalid
- the email or phone number already exists in your database
- the api-key is missing or wrong
- the header
Content-Type: application/jsonis missing from your request
4. A button to try out the endpoint from the interface
You can try the API using the API reference interface. For that, click the " Try it" button and enter you API key. Fill in the fields you want in the body params form below.
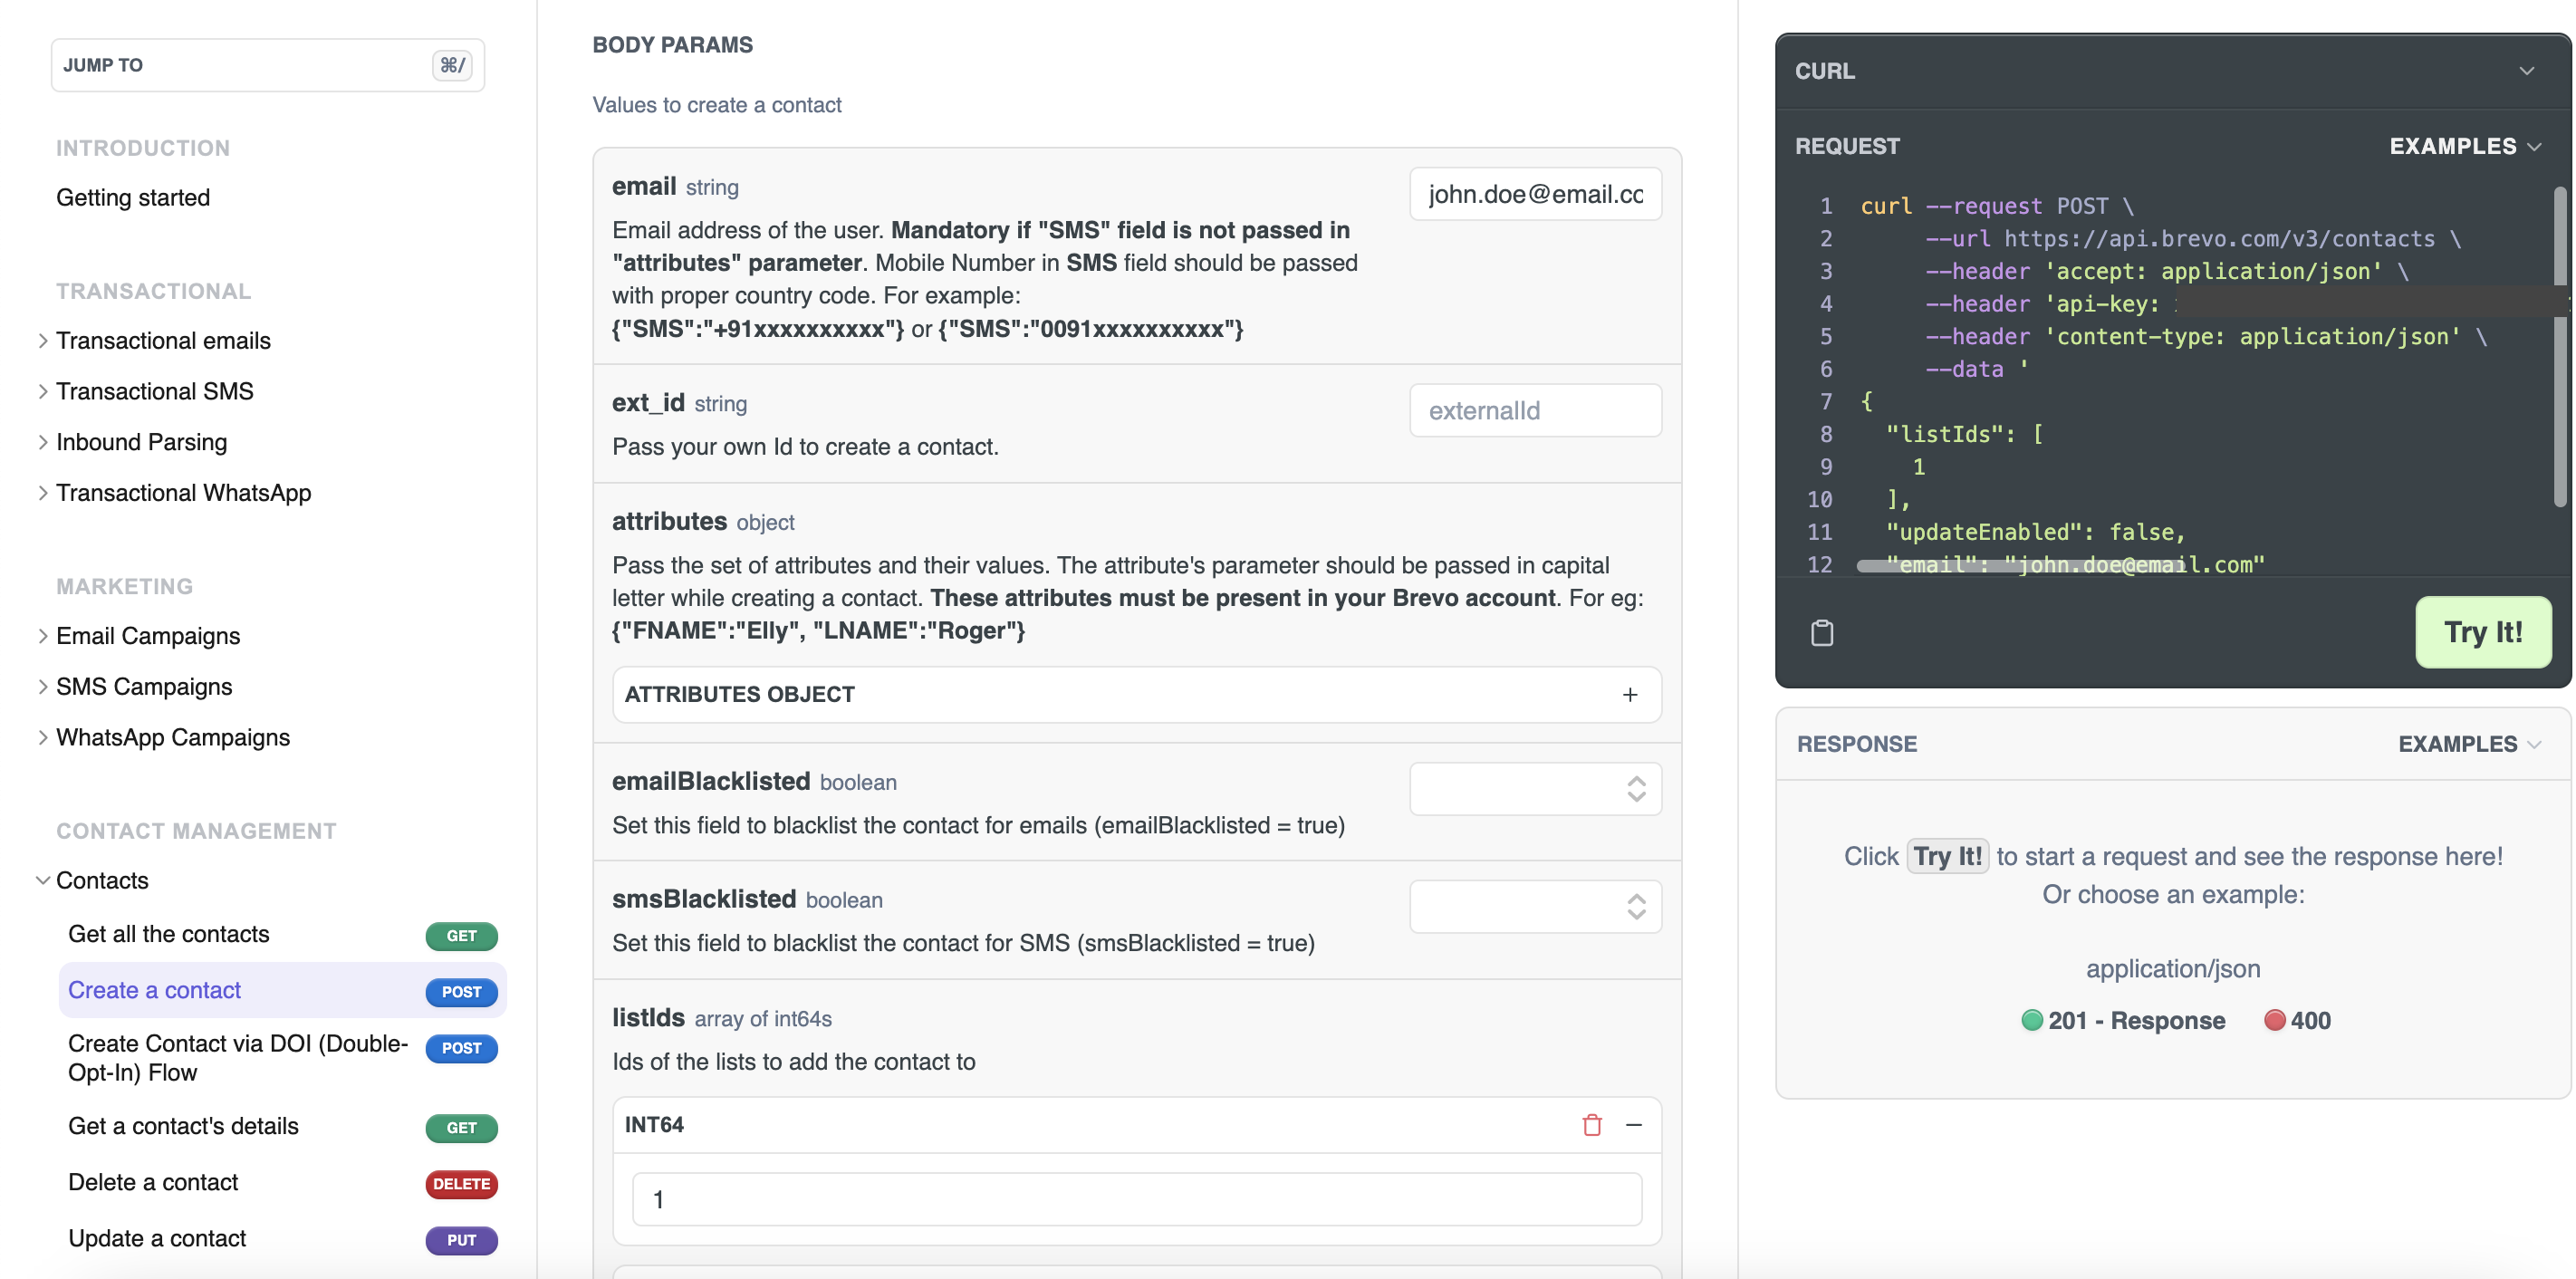
Trying the endpoint using the API reference interface, the response is displayed in the right panel.
If everything goes well, you should see a new contact in Contacts section.
You can also check the new contact details using the API endpoint to retrieve contact information.
API Reference limitations and rating
When you try an endpoint, you will make a real call to the API.
Make sure to check rate limits and your credits as the API reference will use them to make the requests (when sending an email or an sms for instance).
5. Code snippets for you to copy and paste
When you are ready of if you want to make more advanced calls, you can copy the code provided in the right panel section.
curl --request POST \
     --url https://api.brevo.com/v3/contacts \
     --header 'accept: application/json' \
     --header 'api-key: ' \
     --header 'content-type: application/json' \
     --data '
{
  "listIds": [
    1
  ],
  "updateEnabled": false,
  "email": "john.doe@email.com"
}
'
💡 Notice: The code snippets in the API Reference are only there for you to test your API quickly and in the language that suits you.
👍 For your integration, we recommend you use our API clients that will provide you with shortcuts and ease of integration.
Available API clients and their documentations:
Here are sample codes using the API clients. Before using them, follow the installation guide from each documentation linked above.
curl --request POST \
  --url https://api.brevo.com/v3/contacts \
  --header 'api-key:YOUR_API_KEY' \
  --header 'Content-Type: application/json' \
  --data '{"email": "testmail@example.com", "attributes": {"SMS": "0611223344", "FNAME": "John", "LNAME": "Doe"}, "listIds": [11], "emailBlacklisted": false, "smsBlacklisted": true, "updateEnabled": false}'
<?php
require_once(__DIR__ . '/vendor/autoload.php');

// Configure API key authorization: api-key
$config = SendinBlue\Client\Configuration::getDefaultConfiguration()->setApiKey('api-key', 'YOUR_API_KEY');

// Uncomment below line to configure authorization using: partner-key
// $config = SendinBlue\Client\Configuration::getDefaultConfiguration()->setApiKey('partner-key', 'YOUR_API_KEY');

$apiInstance = new SendinBlue\Client\Api\ContactsApi(
    // If you want use custom http client, pass your client which implements `GuzzleHttp\ClientInterface`.
    // This is optional, `GuzzleHttp\Client` will be used as default.
    new GuzzleHttp\Client(),
    $config
);
$createContact = new \SendinBlue\Client\Model\CreateContact(); // \SendinBlue\Client\Model\CreateContact | Values to create a contact

$createContact['email'] = 'testmail@example.com';
$createContact['attributes'] = array('SMS'=>'919900994', 'FNAME'=>'John', 'LNAME'=>'Doe');
$createContact['listIds'] = array(11);
$createContact['emailBlacklisted'] = false;
$createContact['smsBlacklisted'] = false;
$createContact['updateEnabled'] = false;

try {
    $result = $apiInstance->createContact($createContact);
    print_r($result);
} catch (Exception $e) {
    echo 'Exception when calling ContactsApi->createContact: ', $e->getMessage(), PHP_EOL;
}
?>
var SibApiV3Sdk = require('sib-api-v3-sdk');
var defaultClient = SibApiV3Sdk.ApiClient.instance;

// Configure API key authorization: api-key
var apiKey = defaultClient.authentications['api-key'];
apiKey.apiKey = 'YOUR API KEY';

// Uncomment below two lines to configure authorization using: partner-key
// var partnerKey = defaultClient.authentications['partner-key'];
// partnerKey.apiKey = 'YOUR API KEY';

var apiInstance = new SibApiV3Sdk.ContactsApi();

var createContact = new SibApiV3Sdk.CreateContact(); // CreateContact | Values to create a contact

createContact = {
	email: 'testmail@example.com',
	attributes: {
		SMS: '919900993',
		FNAME: 'John',
		LNAME: 'Doe'
	},
	listIds: [11],
	emailBlacklisted: false,
	smsBlacklisted: false,
	updateEnabled: false
};

apiInstance.createContact(createContact).then(function(data) {
  console.log('API called successfully. Returned data: ' + data);
}, function(error) {
  console.error(error);
});
# load the gem
require 'sib-api-v3-sdk'
# setup authorization
SibApiV3Sdk.configure do |config|
  # Configure API key authorization: api-key
  config.api_key['api-key'] = 'YOUR API KEY'

  # Uncomment below line to configure API key authorization using: partner-key
  # config.api_key['partner-key'] = 'YOUR API KEY'

end

api_instance = SibApiV3Sdk::ContactsApi.new

create_contact = SibApiV3Sdk::CreateContact.new # CreateContact | Values to create a contact

create_contact = {
  'email'=>'testmail@example.com',
  'attributes'=> {
    'SMS'=>'919900992',
    'FNAME'=>'John',
    'LNAME'=>'Doe'
  },
  'listIds'=>[11],
  'emailBlacklisted'=>false,
  'smsBlacklisted'=>false,
  'updateEnabled'=>false
};

begin
  #Create a contact
  result = api_instance.create_contact(create_contact)
  p result
rescue SibApiV3Sdk::ApiError => e
  puts "Exception when calling ContactsApi->create_contact: #{e}"
end
from __future__ import print_function
import time
import sib_api_v3_sdk
from sib_api_v3_sdk.rest import ApiException
from pprint import pprint

# Configure API key authorization: api-key
configuration = sib_api_v3_sdk.Configuration()
configuration.api_key['api-key'] = 'YOUR_API_KEY'

# Uncomment below lines to configure API key authorization using: partner-key
# configuration = sib_api_v3_sdk.Configuration()
# configuration.api_key['partner-key'] = 'YOUR_API_KEY'

# create an instance of the API class
api_instance = sib_api_v3_sdk.ContactsApi(sib_api_v3_sdk.ApiClient(configuration))
create_contact = sib_api_v3_sdk.CreateContact(
  email="testmail@example.com",
  attributes={"SMS": "919900991", "FNAME": "John", "LNAME": "Doe"},
  list_ids=[11],
  email_blacklisted=False,
  sms_blacklisted=True,
  update_enabled=False
) # CreateContact | Values to create a contact

try:
    # Create a contact
    api_response = api_instance.create_contact(create_contact)
    pprint(api_response)
except ApiException as e:
    print("Exception when calling ContactsApi->create_contact: %s\n" % e)
// Import classes:
//import sendinblue.ApiClient;
//import sendinblue.ApiException;
//import sendinblue.Configuration;
//import sendinblue.auth.*;
//import sibApi.ContactsApi;

ApiClient defaultClient = Configuration.getDefaultApiClient();

// Configure API key authorization: api-key
ApiKeyAuth apiKey = (ApiKeyAuth) defaultClient.getAuthentication("api-key");
apiKey.setApiKey("YOUR API KEY");

ContactsApi apiInstance = new ContactsApi();
CreateContact createContact = new CreateContact(); // CreateContact | Values to create a contact
createContact.email("testmail@example.com");
Object attr = new JsonObject();
((JsonObject) attr).addProperty("SMS","919090909888");
((JsonObject) attr).addProperty("FNAME","John");
((JsonObject) attr).addProperty("LNAME","Doe");
createContact.attributes(attr);

ArrayList<Long> list_ids = new ArrayList<Long>();
list_ids.add((new Long(11)));
createContact.listIds(list_ids);

Boolean email_blacklisted = new Boolean(false);
createContact.emailBlacklisted(email_blacklisted);

Boolean sms_blacklisted = new Boolean(false);
createContact.smsBlacklisted(sms_blacklisted);

Boolean update_enabled = new Boolean(false);
createContact.updateEnabled(update_enabled);

try {
    CreateModel result = apiInstance.createContact(createContact);
    System.out.println(result);
} catch (ApiException e) {
    System.err.println("Exception when calling ContactsApi#createContact");
    e.printStackTrace();
}
using System;
using System.Diagnostics;
using sib_api_v3_sdk.Api;
using sib_api_v3_sdk.Client;
using sib_api_v3_sdk.Model;

namespace Example
{
    public class CreateContactExample
    {
        public void main()
        {
            // Configure API key authorization: api-key
            Configuration.Default.AddApiKey("api-key", "YOUR_API_KEY");

            // Uncomment below line to configure API key authorization using: partner-key
            // Configuration.Default.AddApiKey("partner-key", "YOUR_API_KEY");

            var apiInstance = new ContactsApi();

            string Email = "testmail@example.com";
            JObject Attributes = new JObject();
            Attributes.Add("FNAME", "John");
            Attributes.Add("LNAME", "Doe");
            Attributes.Add("SMS", "919988998899");
            bool EmailBlacklisted = false;
            bool SmsBlacklisted = false;
            List<long?> ListIds = new List<long?>();
            ListIds.Add(2);
            ListIds.Add(4);
            bool UpdateEnabled = false;
            List<string> SmtpBlacklistSender = new List<string>();

            var createContact = new CreateContact(Email, Attributes, EmailBlacklisted, SmsBlacklisted, ListIds, UpdateEnabled, SmtpBlacklistSender); // CreateContact | Values to create a contact

            try
            {
                // Create a contact
                CreateUpdateContactModel result = apiInstance.CreateContact(createContact);
                Debug.WriteLine(result);
            }
            catch (Exception e)
            {
                Debug.Print("Exception when calling ContactsApi.CreateContact: " + e.Message );
            }
        }
    }
}
// This example is for Typescript-node

var SibApiV3Sdk = require('sib-api-v3-typescript');

var apiInstance = new SibApiV3Sdk.CreateContact()

// Configure API key authorization: api-key

var apiKey = apiInstance.authentications['apiKey'];
apiKey.apiKey = "YOUR API KEY"

// Configure API key authorization: partner-key

var partnerKey = apiInstance.authentications['partnerKey'];
partnerKey.apiKey = "YOUR API KEY"

var createContact = {
	email: 'testmail@example.com',
	attributes: {
		SMS: '919900993',
		FNAME: 'John',
		LNAME: 'Doe'
	},
	listIds: [11],
	emailBlacklisted: false,
	smsBlacklisted: false,
	updateEnabled: false
};

apiInstance.createContact(createContact).then(function(data) {
  console.log('API called successfully. Returned data: ' + data);
}, function(error) {
  console.error(error);
});
For each request, make sure to include the following headers:
api-key: xkeysib-xxxxxxxxxxxxxxxxxcontent-type: application/jsonaccept: application/json
👍 That's it! You've just created your first contact!
Update your contact
Now let's check how to update the contact we just created:
In the API Reference, under Contacts > Update a contact, you'll find the details on how to update a contact.
It is very similar to the contact creation endpoint, the differences are:
- The method (
PUT) is different - You must specify the email of the contact you want to edit as a path parameter (at the end of the endpoint)
💡 If you only have a phone number, use the pattern<phone_number>@mailin-sms.com
Ex: 0612345678@mailin-sms.com
So if we want to update the previous contact, we'll send the following request:
curl --request PUT \
  --url https://api.brevo.com/v3/contacts/testmail@example.com \
  --header 'api-key:YOUR_API_KEY' \
  --header 'content-type: application/json' \
  --data '{"attributes": {"FNAME": "Alex", "LNAME": "Roger"}}'
<?php
require_once(__DIR__ . '/vendor/autoload.php');

// Configure API key authorization: api-key
$config = SendinBlue\Client\Configuration::getDefaultConfiguration()->setApiKey('api-key', 'YOUR_API_KEY');

// Uncomment below line to configure authorization using: partner-key
// $config = SendinBlue\Client\Configuration::getDefaultConfiguration()->setApiKey('partner-key', 'YOUR_API_KEY');

$apiInstance = new SendinBlue\Client\Api\ContactsApi(
    // If you want use custom http client, pass your client which implements `GuzzleHttp\ClientInterface`.
    // This is optional, `GuzzleHttp\Client` will be used as default.
    new GuzzleHttp\Client(),
    $config
);
$email = "testmail@example.com"; // string | Email (urlencoded) of the contact
$updateContact = new \SendinBlue\Client\Model\UpdateContact(); // \SendinBlue\Client\Model\UpdateContact | Values to update a contact
$updateContact['attributes'] = array('FNAME'=>'Alex', 'LNAME'=>'Roger');

try {
    $apiInstance->updateContact($email, $updateContact);
} catch (Exception $e) {
    echo 'Exception when calling ContactsApi->updateContact: ', $e->getMessage(), PHP_EOL;
}
?>
var SibApiV3Sdk = require('sib-api-v3-sdk');
var defaultClient = SibApiV3Sdk.ApiClient.instance;

// Configure API key authorization: api-key
var apiKey = defaultClient.authentications['api-key'];
apiKey.apiKey = 'YOUR_API_KEY';

// Uncomment below two lines to configure authorization using: partner-key
// var partnerKey = defaultClient.authentications['partner-key'];
// partnerKey.apiKey = 'YOUR API KEY';

var apiInstance = new SibApiV3Sdk.ContactsApi();

var email = "testmail@example.com"; // String | Email (urlencoded) of the contact

var updateContact = new SibApiV3Sdk.UpdateContact(); // UpdateContact | Values to update a contact

updateContact = {
	attributes: {
		FNAME: 'Alex',
		LNAME: 'Roger'
	}
};

apiInstance.updateContact(email, updateContact).then(function() {
  console.log('API called successfully.');
}, function(error) {
  console.error(error);
});
# load the gem
require 'sib-api-v3-sdk'
# setup authorization
SibApiV3Sdk.configure do |config|
  # Configure API key authorization: api-key
  config.api_key['api-key'] = 'YOUR_API_KEY'

  # Uncomment below line to configure API key authorization using: partner-key
  # config.api_key['partner-key'] = 'YOUR API KEY'

end

api_instance = SibApiV3Sdk::ContactsApi.new

email = "testmail@example.com" # String | Email (urlencoded) of the contact

update_contact = SibApiV3Sdk::UpdateContact.new # UpdateContact | Values to update a contact

update_contact = {
  'attributes'=> {
    'FNAME'=>'Alex',
    'LNAME'=>'Roger'
  }
};


begin
  #Updates a contact
  api_instance.update_contact(email, update_contact)
rescue SibApiV3Sdk::ApiError => e
  puts "Exception when calling ContactsApi->update_contact: #{e}"
end
from __future__ import print_function
import time
import sib_api_v3_sdk
from sib_api_v3_sdk.rest import ApiException
from pprint import pprint

# Configure API key authorization: api-key
configuration = sib_api_v3_sdk.Configuration()
configuration.api_key['api-key'] = 'YOUR_API_KEY'

# Uncomment below lines to configure API key authorization using: partner-key
# configuration = sib_api_v3_sdk.Configuration()
# configuration.api_key['partner-key'] = 'YOUR_API_KEY'

# create an instance of the API class
api_instance = sib_api_v3_sdk.ContactsApi(sib_api_v3_sdk.ApiClient(configuration))
email = 'testmail@example.com' # str | Email (urlencoded) of the contact
update_contact = sib_api_v3_sdk.UpdateContact(attributes={"FNAME": "Alex", "LNAME": "Roger"}) # UpdateContact | Values to update a contact

try:
    # Updates a contact
    api_instance.update_contact(email, update_contact)
except ApiException as e:
    print("Exception when calling ContactsApi->update_contact: %s\n" % e)
// Import classes:
//import sendinblue.ApiClient;
//import sendinblue.ApiException;
//import sendinblue.Configuration;
//import sendinblue.auth.*;
//import sibApi.ContactsApi;

ApiClient defaultClient = Configuration.getDefaultApiClient();

// Configure API key authorization: api-key
ApiKeyAuth apiKey = (ApiKeyAuth) defaultClient.getAuthentication("api-key");
apiKey.setApiKey("YOUR API KEY");

ContactsApi apiInstance = new ContactsApi();
String email = "testmail2@example.com"; // String | Email (urlencoded) of the contact

UpdateContact updateContact = new UpdateContact(); // UpdateContact | Values to update a contact

Object attr = new JsonObject();
((JsonObject) attr).addProperty("FNAME","Alex");
((JsonObject) attr).addProperty("LNAME","Roger");
updateContact.attributes(attr);

try {
  apiInstance.updateContact(email, updateContact);
} catch (ApiException e) {
  System.err.println("Exception when calling ContactsApi#updateContact");
  e.printStackTrace();
}
using System;
using System.Diagnostics;
using sib_api_v3_sdk.Api;
using sib_api_v3_sdk.Client;
using sib_api_v3_sdk.Model;

namespace Example
{
    public class UpdateContactExample
    {
        public void main()
        {
            // Configure API key authorization: api-key
            Configuration.Default.AddApiKey("api-key", "YOUR_API_KEY");

            // Uncomment below line to configure API key authorization using: partner-key
            // Configuration.Default.AddApiKey("partner-key", "YOUR_API_KEY");

            var apiInstance = new ContactsApi();

            string Email = "testmail@example.com";
            JObject Attributes = new JObject();
            Attributes.Add("FNAME", "Alex");
            Attributes.Add("LNAME", "Roger");

            var updateContact = new UpdateContact(attributes, emailBlacklisted, smsBlacklisted, listIds, unlinkListIds, smtpBlacklistedSender);

            try
            {
                // Updates a contact
                apiInstance.UpdateContact(email, updateContact);
            }
            catch (Exception e)
            {
                Debug.Print("Exception when calling ContactsApi.CreateContact: " + e.Message );
            }
        }
    }
}
// This example is for Typescript-node

var SibApiV3Sdk = require('sib-api-v3-typescript');

var apiInstance = new SibApiV3Sdk.UpdateContact()

// Configure API key authorization: api-key

var apiKey = apiInstance.authentications['apiKey'];
apiKey.apiKey = "YOUR API KEY"

// Configure API key authorization: partner-key

var partnerKey = apiInstance.authentications['partnerKey'];
partnerKey.apiKey = "YOUR API KEY"

var updateContact = {
	attributes: {
		FNAME: 'Alex',
		LNAME: 'Roger'
	}
};

apiInstance.updateContact(updateContact).then(function(data) {
  console.log('API called successfully. Returned data: ' + data);
}, function(error) {
  console.error(error);
});
How to use this code snippet?
- Replace
0612345678@mailin-sms.comby your contact email. - Replace
xkeysib-XXXXXXXXXXby your API key. - The data we send in the JSON body is
{"listIds":[1]}, the list of contact list ids.
Send{"listIds":[1, 5]}to assign several lists at once. - 💡 If you need to unassign a contact to a list, use the parameter
unlinkListIds.
Ex: unassign the contact with{"unlinkListIds":[1]}
If everything goes well, you'll get a success response with the status 204.
Wrapping up
👍 Congratulations! You are now ready to repeat the requests for your contact list.
You've also learned the basics on how to use Brevo API documentation and the API Reference.
To go further
If you have many contacts, consider taking a look at the advanced feature to import contacts using a .csv or .txt
Updated 13 days ago